

RAINSCREEN SIDING INSTALLATION

INSTALLING THE CLIMATE-SHIELD® RAINSCREEN SYSTEM THE RIGHT WAY
If you're considering a rainscreen installation for your project, the Climate-Shield® system offers a straightforward, highly effective solution. Whether you’re a contractor or a confident DIYer, this system is designed to streamline the process while protecting your structure with lasting performance and style.
When you follow the official Climate-Shield installation guidelines, you set yourself up for success. With proper preparation, your rainscreen wood siding installation won’t just look great—it’ll perform well against moisture, wind, and time.
We’ve pulled together the essential steps and resources to walk you through the process. Whether you're installing rainscreen cladding for the first time or have experience with similar systems, you’ll find the process intuitive, and if you're working with premium materials like Ipe, it’s even more important to get each detail right.
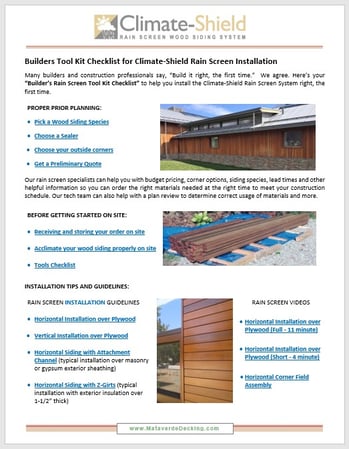
This helpful step by step Builders' Rain Screen Checklist will help you deliver a rain screen project you will be proud of for years to come.
Let’s get started.

First: What’s Your Wall Assembly?
Before installing rainscreen cladding, you’ll need to assess the surface you’re working with. The Climate-Shield® system is versatile—it works with different wall types and orientations.
Installing Wood Siding Over Plywood Sheathing
DOWNLOAD HORIZONTAL INSTALLATION GUIDELINES
RAINSCREEN INSTALLATION VIDEOS
Sometimes it’s easier to watch than read. That’s why we’ve created a pair of helpful videos showing helpful information regarding wood siding rainscreen installation:
Full Tutorial (11:25) – A detailed look at the entire process from start to finish.
Quick Overview (4:25) – Ideal if you're looking for a faster visual reference.
These videos walk you through installing rainscreen siding with clarity—no guesswork involved.
Vertical Installations Over Plywood Exterior Sheathing
The Climate-Shield CS2 rainscreen components will save lots of time when installing your siding vertically over plywood, OSB or wood exterior sheathing. There's no need for furring strips.

VERTICAL RAINSCREEN SIDING INSTALLATION OVER PLYWOOD SHEATHING
DOWNLOAD VERTICAL RAINSCREEN INSTALLATION GUIDELINES
Installing Over Non-Plywood Surfaces?
You’re not limited to traditional wood sheathing. The Climate-Shield system adapts to a variety of wall assemblies including:

CLIMATE-SHIELD CSAC8 ATTACHMENT CHANNEL
Why Use a Rainscreen System?
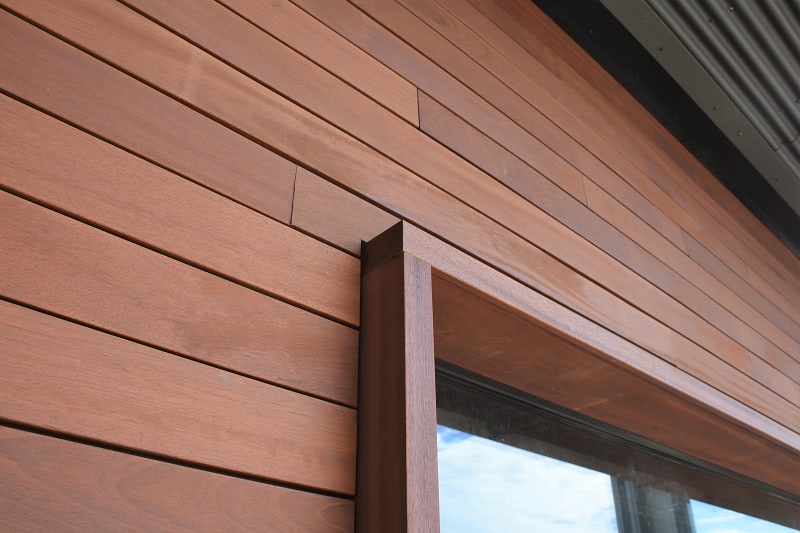
Installing rainscreen cladding isn’t just about appearance—it’s about performance. The air gap created by the system promotes drainage and ventilation, helping to reduce moisture buildup and prolong the life of your siding. It’s a smarter way to protect your structure year-round.
Ipe Rainscreen Siding Installation Tips
When working with Ipe, pre-drill every fastener hole to avoid splitting and use stainless steel screws for long-term durability. Since Ipe is dense and naturally weather-resistant, it pairs perfectly with the Climate-Shield system for a beautiful and long-lasting exterior.
Installing Rain Screen Over Exterior Insulation with Z-Girts
If your design calls for thicker continuous insulation (more than 1-½”), you’ll want to use the CSZG Climate-Shield Z-Girt system. These marine-grade aluminum Z-girts not only deliver a solid attachment method, but they also help avoid galvanic corrosion in your wall assembly.

This approach works seamlessly with our horizontal installation system—giving you the flexibility to work with complex wall assemblies without compromising performance.
DOWNLOAD HORIZONTAL RAINSCREEN INSTALLATION GUIDELINES USING
RELATED: