

MATAVERDE® EUROTEC® DECK SYSTEM INSTALLATION
ROOFTOP DECK CONSTRUCTION AND INSTALLATION

Planning Your Rooftop Deck System Project
Before you start your rooftop deck construction, it is imperative to plan for a safe and successful installation.
Check the Substrate:
If you are constructing a deck over a concrete patio, this would include properly inspecting the suitability of the concrete pad for a pedestal deck.
If you are considering a rooftop deck or balcony deck system, this would include having an inspection by a registered architect or professional engineer to determine the suitability of your existing roof for constructing a roof top deck.
Check with the Jurisdictions Having Authority:
First, find out if rooftop decks are allowed in your area.
Then, if a building permit is required for your project, always check with your local building inspector for local loading requirements and any other applicable building code rules and regulations before installing a rooftop deck.
Take Accurate Overall Deck Area Measurements:
Make sure you take accurate measurements including: the length of the deck in the direction you will be running your joists; the length of the deck perpendicular to the joist direction; the joist spacing; and finally the height from the top of your roof (or patio) to the top of the decking.
It is also very helpful to know which thickness and wood decking species you plan to use. The Mataverde Eurotec Quotation/Estimate Form is a very useful tool to ensure you have included all the necessary information for proper project planning.
Rooftop deck construction and installation is not necessarily that difficult, but proper pre-planning is critical to ensure its success. Using the best rooftop deck materials is the next step.
Get a Preliminary Quote for Budgeting and Planning Your Rooftop Deck
Once you have your preliminary layout, request a preliminary quote for your rooftop deck project. When we receive your request, we may have some questions. Once these questions are answered, we will begin a preliminary layout for your project and provide a preliminary quote for your consideration.
Are you ready to price your rooftop deck project? We are here to help, contact our team:

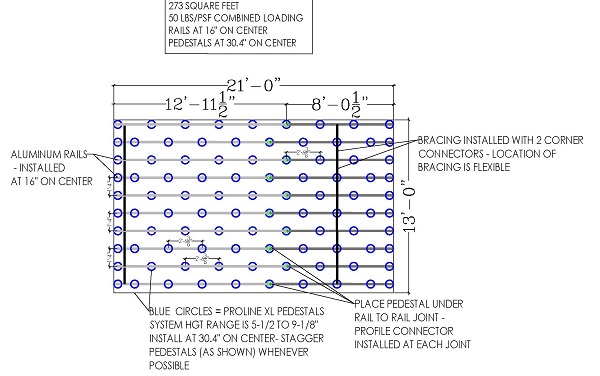
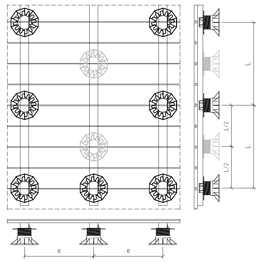
A simple rooftop deck layout plan may look similar to this:
Review Your Rooftop Deck Layout
When you receive your rooftop deck layout, please look it over. If everything works to your liking, now is the time to confirm your system heights to verify the correct heights of your adjustable roof pedestals.
You can use a laser level, a builder's level, or a water level to check your roof system heights. The adjustable rooftop deck pedestals all have a range of heights they will work between. The goal here is to check your heights to make sure you have the correct pedestals to complete you rooftop deck installation without delay.
Ordering, Receiving, and Preparing the Right Rooftop Deck Materials
We love happy, satisfied customers. They make us happy, too. We have developed some helpful tools to guide you along the way. To minimize any surprises, delays, shortages and potential frustrations when you are ready to start your rooftop deck construction, we have developed a checklist to help you prepare for a successful project.
The Mataverde Success Plan is a great tool to make sure you are properly prepared to build an awesome rooftop deck project that you can be proud of and enjoy for many years to come.
The Mataverde Success Plan shares information about the proper quantity, quality, size and use of materials, receiving your delivery, proper wood acclimation and much more.
RELATED: DOWNLOAD THE MATAVERDE SUCCESS PLAN
Getting Started with Rooftop Deck Construction
After you have received your building permit, and the area where the deck will be assembled has been inspected by a licensed architect or engineer for structural soundness and suitability, you should be ready to start the actual deck assembly.
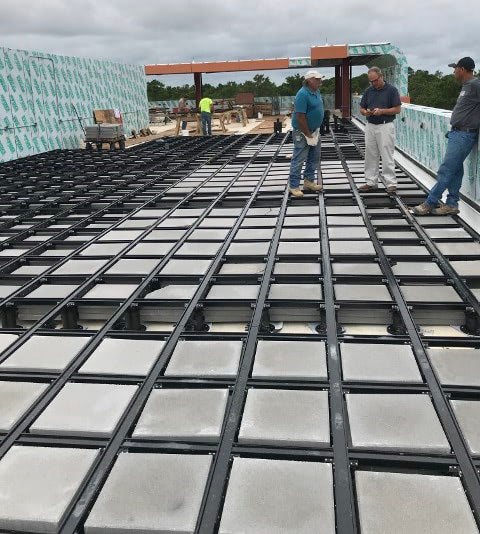
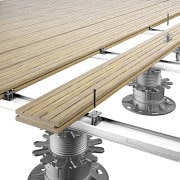
Lay Out Your Eurotec Rooftop Deck Pedestals
Start by positioning the appropriate adjustable rooftop deck pedestals in rows with the proper spacing for your project’s design. For example, if your deck will be built at 16” on center joist spacing, start by lining the pedestals up at 16” apart. Next, space each deck pedestal the appropriate distance apart along where the joists will line up.
Please refer to the maximum spacing and loading requirements chart for the proper spacing. For example, the maximum spacing of rooftop deck pedestals along the Aluminum System Profile (joist) for a 16” O.C. deck designed for a 50 pounds per square foot working load is 30”.
Lay Out the Eurotec Aluminum System Profile (joists)
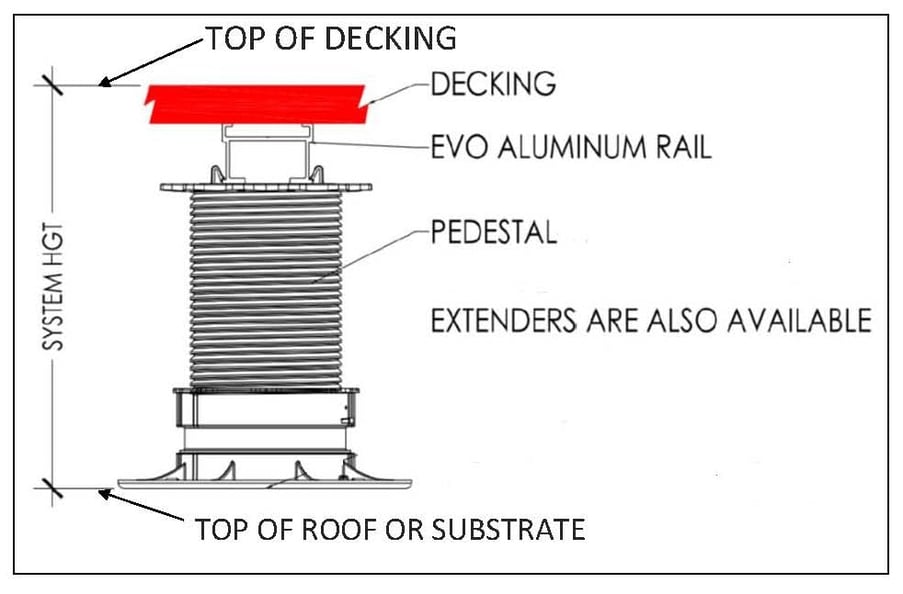
Once you have placed your Eurotec rooftop deck pedestals in their proper locations, you are ready to “click” the Aluminum System Profile joists into position on the pedestals.
 1. Simply “click” the Aluminum System Profile into place on the Clickfoot attachment on your pedestals.
2. Check all of Aluminum system Profile joists for levelness. Adjust the height of the deck pedestals until the entire framework is set to the proper desired pitch and levelness.
3. For joist lengths shorter than 13’-1-1/2”, cut your joists to the proper length using an aluminum-cutting saw blade.
4. If the length of your joists is longer than 13’-1-1/2”, use an Aluminum System Profile Connector to join additional lengths together. Always place an additional pedestal under this joint for support.
OPTIONAL BRACING
5. For additional strength, after your main joists are in place, cut pieces of the Aluminum System Profile into the proper lengths for lateral bracing at appropriate intervals. Fasten the lateral bracing pieces into place using Eurotec Corner Connectors and Bighty screws.6. If additional weight or bracing is desired, you can install additional bracing at the corners of your deck and insert concrete pavers for weight. Use corner connectors to create a “shelf” for your concrete pavers and be sure to pay attention to the height of the paver to leave adequate ventilation for when you install the decking above these pavers.
7. Double-check your completed frame and make sure everything is squared up and level before installing your decking boards.
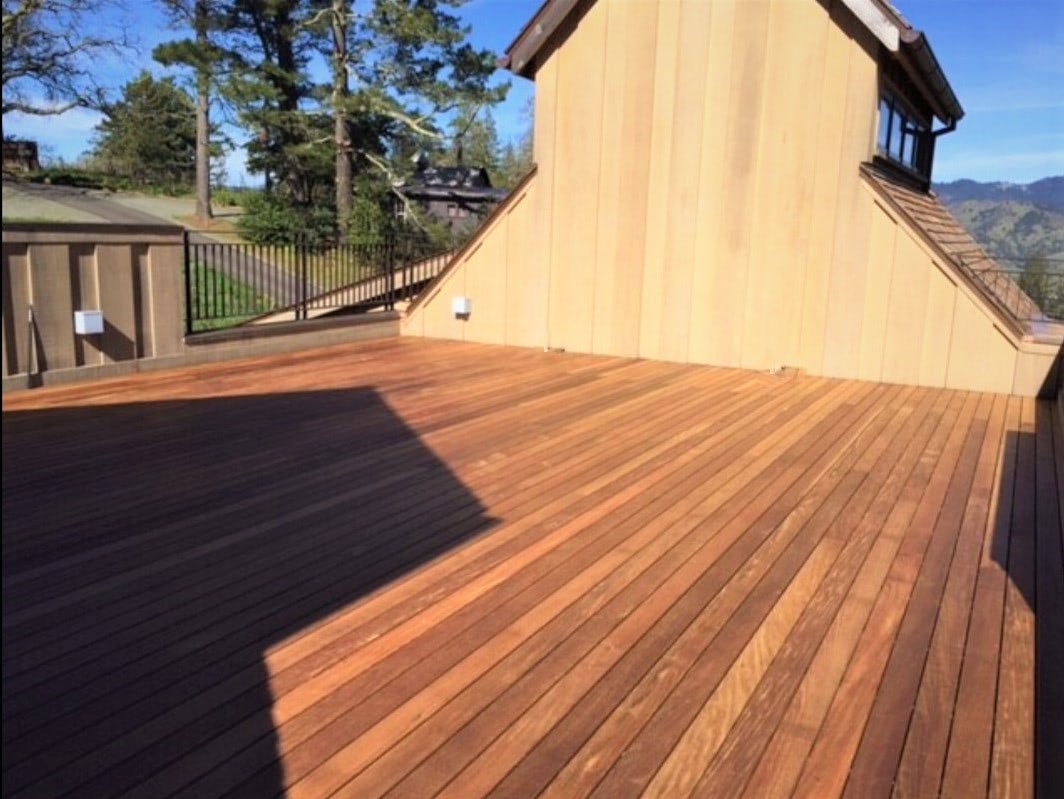
Considering Roof Deck Design Ideas? We have a helpful portfolio for more inspiration.
Download FREE the "Rooftop Deck Project Portfolio: now.

Check out this rooftop deck installation video featuring the EVO Aluminum system profile joists, Pro adjustable rooftop deck pedestals, hidden fasteners and hardwood decking.
Installing the Deck Boards on the Mataverde Eurotec Framework
After you have set up the Eurotec deck framework properly, double-check all fastening and check your framework for levelness and squareness one more time. You are now ready to install your decking boards.

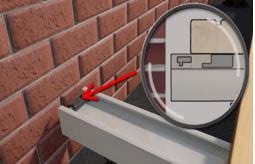
The three options for installing the Mataverde Eurotec Deck System are the Profile Screw for visible fastening, and the Deck Glider method or Twin System Holder method for hidden fastening.
The Eurotec Profile Screw Fastening Method
![]() Because of its exceptional fastening strength, perpendicularly screwing a deck board into a joist is the strongest of all decking fastening methods. Additionally, face screwing provides extra strength laterally to increase the overall strength of the entire deck structure measurably.
Because of its exceptional fastening strength, perpendicularly screwing a deck board into a joist is the strongest of all decking fastening methods. Additionally, face screwing provides extra strength laterally to increase the overall strength of the entire deck structure measurably.
The Eurotec Profile Screw is made of stainless steel for longer life span and durability. Profile Screws are made from #304 stainless steel for standard hardwood decking installations and also #316 stainless steel for marine environments. When using Mataverde Premium Hardwood Decking species such as Ipe, Cumaru, Garapa or FSC Machiche, the deck boards must be pre-drilled. Then the Eurotec Profile Screw can be used to attach the deck boards to the framing. The drill point allows for direct penetration into the Aluminum System profile joists for exceptionally strong fastening power.
There are two widely used ‘tried and true’ methods of face screwing hardwood decking to the framework:
Option 1: Standard pre-drilling (for visible flush mounted or slightly recessed screw heads). This method is faster to install than the following option and is often used on high traffic or public decks, walkways and boardwalks.
Option 2: Pre-drilling the deck boards with a countersink drill bit and then plugging the screw heads (for non-visible screw heads). This method, although time consuming, is often the preferred fastening method for artisans and master craftsmen.

WATCH: MATAVERDE EUROTEC PROFILE SCREW INSTALLATION VIDEO
RELATED:
DOWNLOAD THE MATAVERDE EUROTEC QUOTATION/ESTIMATION FORM
DOWNLOAD THE EUROTEC ALUMINUM SYSTEM PROFILE INSTALLATION GUIDELINES
ROOFTOP DECK INSTALLATION CONCEALED DECK FASTENING METHOD #1
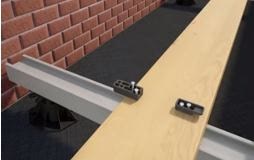
The Mataverde Eurotec Deck Glider Hidden Fastener Method
For a clean and sleek decking appearance, many clients prefer the unencumbered look of a hidden deck fastener. The Mataverde Eurotec Deck Glider fastening method is a great way to achieve this pristine look. Deck Gliders are installed to the underside of each deck board with the provided screws. Use the Deck Glider for 6” (nominal) deck boards and the Mini Glider for 4” (nominal) deck boards.
Yes, this installation method is more labor intensive. But it is clearly the most effective way to handle seasonal wood movement over time and build a longer lasting rooftop deck.

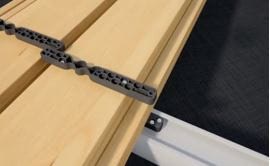
The Mataverde Eurotec Deck Glider Components
|
Step One: Start your decking installation by screwing the female end of the Glider Starter Clip onto the Aluminum System Profile. (The male end of the Glider Starter Clip is screwed onto the underside of your first decking board.)
|
 |
|
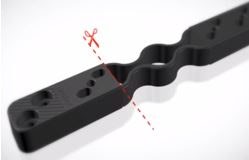
Step Two: Cut off the ‘fastening end’ of a Deck Glider (the one that has two screw holes on the end). This piece will be screwed into bottom of the deck board in the appropriate place to line up with your aluminum joist.
|
 |
|
Step Three: Screw the male end of the Glider Starter Clip into the bottom of the deck board and the “cut off” end of the Deck Glider on the other edge of your deck board. (Pre-drilling a pilot hole is required.)
|
 |
|
Step Four: Once your first deck board is lined up and in place, fasten your first deck board by screwing the exposed edge of the Deck Glider to the Aluminum System Profile into the two screw holes.
|
 |
|
Step Five: Now line up your next rows of deck boards and start fastening the Deck Gliders to the bottom of each deck board. Alternate the spacing left and right for each row of deck boards so they will fit into the Aluminum System Profile joist properly.
|
 |
|
Step Six: Choose any of the four spacing options available on the Deck Spacer, Flip the board over and slide it into place. The unfastened end will be held in place by the prior row of decking. Fasten the other end of the Deck Glider to the joist.
|
 |
WATCH: MATAVERDE EUROTEC CONCEALED FASTENER INSTALLATION VIDEO
RELATED: DOWNLOAD THE EUROTEC ALUMINUM SYSTEM PROFILE INSTALLATION GUIDELINES
ROOFTOP DECK INSTALLATION CONCEALED DECK FASTENER METHOD #2
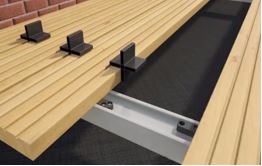
The Mataverde Eurotec Twin System Holder Hidden Fastening Method
![]()
 An alternative hidden deck fastener method is also available - the Eurotec Twin System Holder. The big benefit of this option is that it saves significant labor time and labor cost. This method uses pre-grooved decking boards and the Twin System Holder fasteners are screwed directly into the Aluminum System Profile.
Because wood moves as it acclimates, and then seasonally afterwards, we recommend using 5/4 x 4 pre-grooved decking for best performance and best results. This fastener is faster, easier and more cost effective than any other hardwood deck fasteners we have ever seen.
Install Your First Rooftop Deck Board
After your pedestals and aluminum system profiles are in place, start with your first decking board. Because the Twin System Holder only works when you are using it between two boards, you can start your first board by either:
-
Pre-drilling the first pre-grooved deck board on the starting edge and fasten with a profile screw, OR
-
Use the Deck Glider Starter as shown in steps 1, 2 and 3 in the Deck Glider installation steps on the prior page.
 Twin System Holder Detail
Installing the Rest of the Pre-Grooved Decking Boards
Once your first deck board is in place, you are ready to start with the Twin System Holders by twisting these innovative fasteners into place on the Aluminum System Profile.
-
Set the fasteners in place loosely into the groove of your first deck board.
-
Then, position your next row of decking into place.
-
Hold the board tightly in place while fastening. The built-in spacers on the top of the Twin System Holder will automatically set the correct gap between deck boards.
-
EXPERT TIP: To hold the deck board tightly into place, use a clamp or Bow Wrench to hold the board tight until it is fastened, especially if you are working alone.
-
Now, screw your Twin System Holder into the Aluminum System Profile. Tighten the screw securely, being careful not to over tighten.
-
EXPERT TIP: To prevent over tightening, it is helpful to test the proper torque setting of your driver gun first on an area of your Aluminum System Profile that won’t interfere with your deck board layout. Don’t worry, the test hole you leave behind will serve as a weep hole.
-
Repeat the process until you reach your last deck board.
Installing Your Last Deck Board
Similar to your first deck board, you can choose to either:
-
Pre-drill and use a face screw on the outer edge, OR
-
Use the Deck Glider End piece on the outer edge
RELATED: DOWNLOAD THE EUROTEC ALUMINUM SYSTEM PROFILE INSTALLATION GUIDELINES
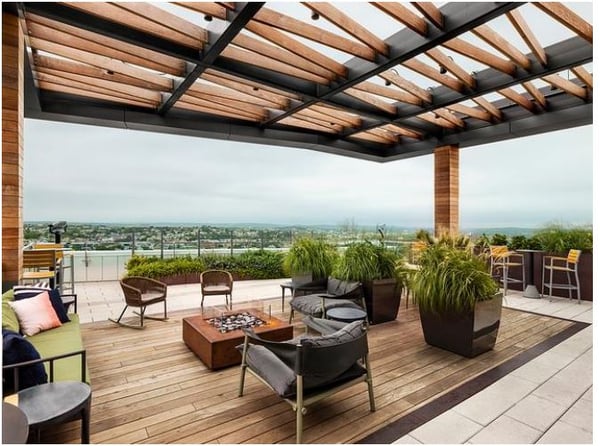
Need some inspiration for your rooftop deck design?
Looking for rooftop deck ideas? Download the FREE "Rooftop Deck Design Ideas Portfolio" now!
RELATED: