
RAINSCREEN SIDING INSTALLATION

INSTALLING THE CLIMATE-SHIELD® RAINSCREEN SYSTEM IS SIMPLE AND EFFECTIVE
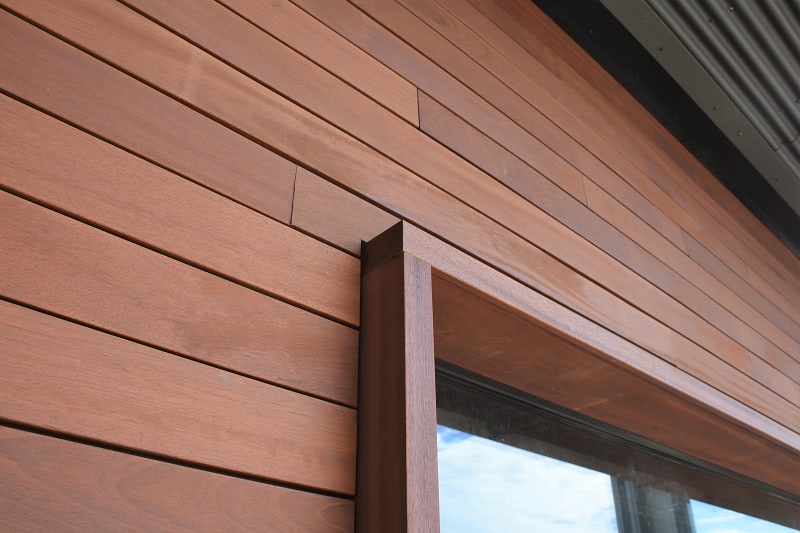
Proper preparation and installation of the Climate-Shield™ Rain Screen Siding System helps ensure that your building envelope is properly protected.
By following the Climate-Shield Installation Guidelines, you are on your way to a beautiful rain screen wood siding installation to shield your entire building envelope and home or structure naturally and beautifully.
Our online resource center will save you time, worry and expense. When you are ready to install your rain screen siding system, we have prepared the following step-by-step instructions to guide you throughout the project. You can ensure that your siding material is installed correctly and save yourself unnecessary aggravation.
If you want to install this system on your own or with minimal help, please refer to this website and look forward to a successful project.
Each step of the installation process is explained in detail using basic construction terms. Even if this will be your first time installing this kind of protective building envelope, you should be able to read and understand the steps.
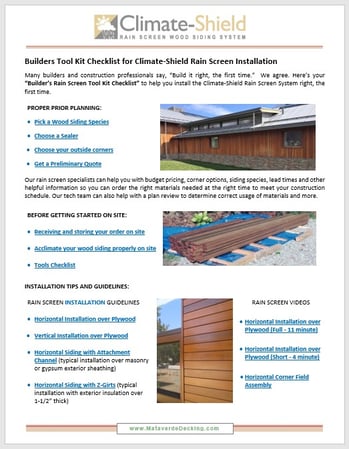
Here's a step-by-step Builders' Rain Screen Checklist to help you deliver a rain screen project you will be proud of for years to come. We hope this is helpful.

What type of wall assembly are you cladding over?
ARE YOU INSTALLING WOOD SIDING OVER PLYWOOD SHEATHING?
HORIZONTAL RAINSCREEN SIDING INSTALLATION OVER PLYWOOD SHEATHING
DOWNLOAD HORIZONTAL INSTALLATION GUIDELINES
HORIZONTAL RAINSCREEN INSTALLATION VIDEOS
Check out the 11:25 minute video for horizontal wood rainscreen installation here:
Prefer a shorter version? Check out the 4:25 minute horizontal wood rainscreen installation video here:
VERTICAL RAINSCREEN SIDING INSTALLATION OVER PLYWOOD SHEATHING
DOWNLOAD VERTICAL RAINSCREEN INSTALLATION GUIDELINES
What if you are not using plywood sheathing?
Climate-Shield® Horizontal Rain Screen Installation Guidelines with CSAC8 Attachment Channel
 For installations over other surfaces, such as masonry walls, exterior gypsum sheathing, or rigid insulation up to 1-1/2" thick, please refer to the Climate-Shield Rain Screen System Horizontal Installation Guidelines with CS2 Clip and CSAC8 Attachment Channel:
DOWNLOAD HORIZONTAL RAINSCREEN INSTALLATION GUIDELINES USING
CLIMATE-SHIELD CSAC8 ATTACHMENT CHANNEL
Are you installing rain screen with Z-Girts?
Climate-Shield Horizontal Rain Screen Installation Guidelines using CSZG Climate-Shield Z-Girts

If the design requires a rain screen installation over exterior insulation more than 1-1/2" thick, the Climate-Shield Z-Girt is an excellent attachment option. The Z-girt provides a marine grade aluminum attachment to eliminate potential galvanic action in your wall assembly.
DOWNLOAD HORIZONTAL RAINSCREEN INSTALLATION GUIDELINES USING
RELATED: