


In a previous article we discussed some ways to make cutting high-density hardwood decking a bit easier. Well that’s only half the battle. Fastening the deck boards when installing Ipe hardwood, or any wood decking for that matter, is where most of the labor lies. Learn how to make fastening and installing your hardwood decking easier.
I’d rather be the ‘cut guy’ on a deck installation crew anytime because fastening deck boards is very hard work And fastening deck boards with face screws is absolutely the strongest way to build a deck. It’s a battle crawling around on your hands and knees, hunched over all day and the high density hardwood decking likes to fight back. Hopefully these tips will make your hardwood deck installation job a little easier.
You Know the Drill
One of the main complaints about installing hardwood decking is that the screws must be predrilled. Of course, that’s true, but this is also true for most decking woods. Even softwoods like cedar and redwood should be predrilled to prevent splitting. As for those “self-tapping” screws for synthetic decking, I’d personally rather self-tap a tooth filling.
What makes Ipe decking and the other hardwood decking different is the density of the wood. Drilling takes a bit more effort, okay a lot more effort, but, as with cutting, it is much easier to let the tools do the work for you. Start with sharp bits and countersinks. That old countersink kicking around the bottom of your drill bag will only bring heartache, just go buy a new one. In fact, buy three.

When drilling, let the bit do the work. Drill bits actually cut wood, so in the same way that forcing a sawblade through wood is not very effective, trying to ram a drill bit through is not going to work well either. Take a breath, slow it down, and with some light pressure let the drill bit do the cutting. It may take a few 'ins and outs' to let the bit clear itself of sawdust, and keep the bit cooler. If you force it, you’ll heat it up, dull the bit, burn out your battery and any time you saved by rushing will be lost trying to extract that broken bit that is now sticking out of the deck.
Everyone Loves a Tight Butt Joint
Tight butt joints are elusive in all decking jobs, in fact, in all woodworking jobs. We discussed in an earlier article how to make better cuts on hardwood deck boards, because, for obvious reasons, the better the cut, the better the butt joint. However, the installer has a role to play as well. The installer can sometimes make a good cut look bad and a bad cut look good.
A lot of times, especially when there’s multiple people installing, once the board is laid down everyone goes nuts and starts driving screws all over the place. Stop the madness. Hold off on screwing the rest of the board until you are confident the joint looks good. If you don’t pay attention, you are either stuck with a sloppy joint or you’ll have to remove a bunch of screws to recut it.
Here’s a trick I’ve learned over the years to get the joint tight (almost) every time. Hold the board up slightly at the joint. By this I mean, butt your two boards together tight but hold the bottom of the unattached board you are installing against the top of the previous board.
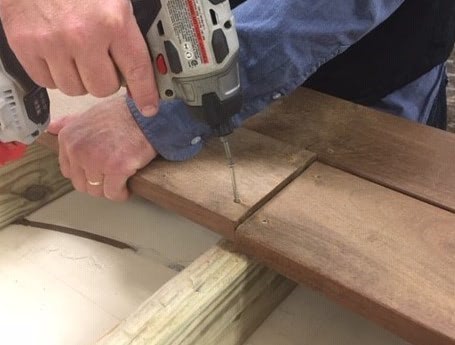
Lift the end of your deck board slightly for a tight butt joint
Hint* If using a 'scarf joint' or 'bevel joint' or 'weather joint' cuts, hold the unfastened deck board end a touch uphill of flush. Then drive your first screw one joist over from the joint, this will hold the board in place. When you drive the screw at the joint, it will drive the board down keeping the joint as tight as possible. You may have to give it a little love tap for encouragement.
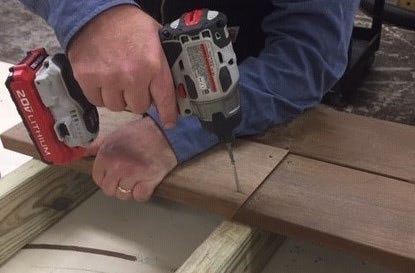
Same technique for your butt joint, this time using a scarf joint
(bevel joint) at the end of the decking boards
Keep Your Deck Boards on the Straight and Narrow
The hallmark of a well installed deck is clean, straight lines. ‘Wobbles’ in the gaps between deck boards not only looks sloppy but, by the time it’s finished, can also throw the whole deck out of whack. One of the main challenges when installing high-density hardwood decking is wrestling the boards into place and maintaining that clean, consistent gap.

Tips to properly align your deck boards:
Set your gap between deck boards.
At the beginning of the deck board installation, pick a gap size between your deck boards and either find, or make, a spacer that will work. If you make spacers, make enough for everyone to use for the whole job. If you end up making more later, there is a good chance they will be slightly different than the originals, creating a discrepancy that will add up over time. A simple solution is to find a nail that has the thickness you like, 8d or 10d nails are good options, and just make sure everyone uses the same size for the whole job.
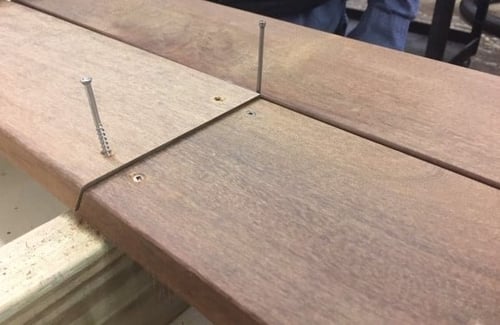
Use an appropriate sized spacer consistently to set a uniform gap between decking boards. Here, a small diameter nail is used as a spacer, creating a narrower gap that is typically used on a covered porch.
Align your rows of decking.
Natural wood decking boards are rarely, if ever, perfectly straight. Work with it. If your deck board is too bowed to straighten out, cut it into shorter usable lengths. If there is a slight bend in the deck board, here are some tips to make best use of them.
The tough part is getting the boards tight against the spacers and holding them there while you set your screws. This can be achieved in a couple of different ways. Many people will drive a chisel into the joist in front of the board and use that to pry the board over. I prefer to use a cat’s paw (nail puller) for that task. The two prongs grab better than a chisel and, because it is a solid steel bar, it provides greater leverage for prying.
Use an appropriate technique to straighten out deck boards before fastening
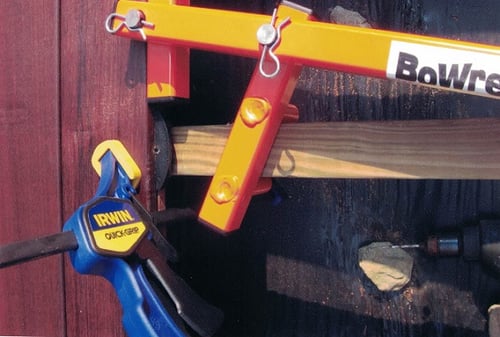
There are also several purpose-made board straightening devices (like Bow Wrench shown above as an example) that work very well. They vary in design but are essentially long handled camming devices that fit over the joist and push the deck board into place. The first main benefit is that they offer great leverage and need less effort to use due the long handle, which you may appreciate after the hundredth or so time you need to pry a board over. Secondly, they help with a one-person installation because they can usually be worked with a knee, elbow, forehead, or whatever, which frees up the hands for screwing the deck board into place.
Chill Mon
A recurring theme in the installation of hardwood decking is to just slow it down and take it easy. Keep your tools sharp and don’t force anything. These high-density hardwoods are unforgiving, so just put your effort into the task in front of you and don’t try to rush it. Slow it down to speed it up. Put on a little Bob Marley, picture some palm trees swaying in the sun, and your next deck install will be a day at the beach.
Check out hardwood decking project picture galleries here
Looking for hardwood decking samples?

Would like to see how much your decking will cost?
Request a Decking Quote today


Related Posts

