
Adding a hardwood deck to your home is a fantastic decision. To enhance its appearance, consider installing a picture frame design. This technique, also known as a breadboard or border installation, involves placing a border board around the deck's edge. Here are some expert tips to help you picture frame your deck properly.

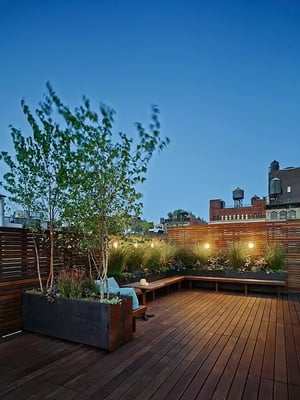
Hardwood deck with Ipe decking picture frame border, and Garapa decking
Although installing hardwood decking can be difficult, it's much easier if you have the right tools and techniques. The decking material you choose for your picture frame can be the same material as the main deck, or a different size of the same wood species. Or even a different wood decking species to provide some contrast.
Whatever wood you choose, here are some tips to help you along the way.
Download this article as a printable PDF guide! Click below.


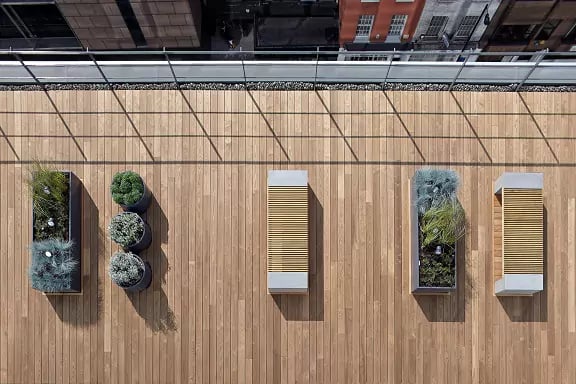
Example of an Ipe hardwood deck, installed diagonally and framed out for a triple row of picture framed Garapa hardwood decking picture frame border
Avoiding Common Mistakes: Picture Frame Deck Layout
The first thing you’ll need to do is figure out how much of the picture frame deck board is going to hang out past the framing. This will determine where the inside of the border piece will land.
This is the crucial bit of information you need. You need to know this before doing anything else. Fortunately, there’s not much to it.
A typical overhang for wood decking, or flooring, or stairs for that matter, is 1”.
At each corner, measure back from the outside of your framing, (or trim if the deck is trimmed), the width of your decking minus 1”. For a 5-1/2” board for example, you will measure back 4-1/2”.
Connect the dots and snap chalk lines around the whole deck.
You’re good to go!
Don’t Forget About Your Railing Posts
Easy right? Yeah well, nothing is that easy. Let's talk about the railing posts. These are typically located just inside of the deck framing, right in the way of your border piece.
The best-case scenario is that the border falls halfway on the posts. This will allow you to notch both the border and the decking around the posts without having to fight it too much.
 Example of the picture frame deck boards notched around the posts
"I Hope the Posts Don't Land in the Center of my Picture Frame Board!
The worst-case scenario is that the posts land entirely within the border piece.
In that case you will have to cut a hole in the wood and slide it over the top of the post. If you are trying to cut around multiple posts on the same board, most likely those posts will be at least a little twisted.
This scenario can get ugly quickly. If you are trying to cut around a finished post where you need to have tight cuts, good luck to you. It is virtually impossible.

Two techniques for installing picture frame decking around posts
To resolve this issue, many skilled carpenters will use shorter lengths of picture frame decking boards, to minimize the number of complex cuts on a single board.
One option is to notch the boards around the deck posts, using shorter lengths of wood decking for picture frame boards.
Another technique when the posts fall in the middle of a picture frame deck board is to combine the two approaches shown above. Cut a hole in the center of a picture frame board to slip over the post in the middle.
Then notch the ends of the picture frame deck board to fit around the other posts.

Another 'hybrid' method of installing picture frame deck boards around posts
Setting Your Picture Frame Decking Border: Precision and Technique
After you have determined your deck layout, the next step is to get some wood decking down. There are different opinions on how best to start.
Some people think it is best to fasten the whole border first and then lay the deck boards within the picture frame. Others believe it best to lay all the decking first, running the ends wild, and then snap a line, cut the ends and fit the border to the decking.
I prefer a hybrid approach:
 Example of installing the picture frame decking first, then the 'field' decking
There are so many variables and options in deck design and layout. But to simplify let’s assume we are doing a rectangular deck and running a border on the three outer sides.
-
Leave the side against the house to rip for your final decking board.
-
In this case, layout and fasten the border pieces on one side and on the outer edge, cutting the end of the outer border (picture frame) piece at a mitered 45 degrees with the short point on the line you snapped earlier.
-
Leave the other side open.
-
Start running your decking from the outside in, butting tight to the border edge on the side and spacing off the outer border.
-
When you get to the other side, cut the first board you lay on the snapped line, flush with the short point of the mitered corner of the border.
-
Run the rest of the decking several inches past where you would like it to finish.
-
(Don't cut them to length yet!)

Sketch above shows the recommended decking layout with step by step
- Carry on in this way until you get to the second to last deck board.
- Cut this board to the finished length on the line you snapped earlier.
- Then rip the last board accordingly, to fit against the house.
- Cut this last board at a mitered 45 degrees with the short point flush with the edge of the previous board.
Picture Frame Deck: The Final Cut
Now, you're ready to make your final cuts on the ends of the decking boards you intentionally left long.
- Snap a chalk line between the two short points of the border, or between your finished cuts between the posts. This is your cut line.
- The best way to cut this is with a track saw or a circular saw with a guide to ensure a nice straight cut. If you are confident, then go ahead and freehand it. And don’t mess up.
- This is the reason you cut the first and last boards and the boards around the posts to length. This gives you room to run your saw straight through without having to trim the corners near your finished pieces.
- If you do end having to nip a corner off, an oscillating multi tool works best.
- The only thing left to do is cut and fit the remaining border piece. I like to measure long point to long point, one because it’s easier and secondly because you avoid the posts. Maybe deliberately go a touch long to leave some room to adjust the angles if necessary.
- Mark and cut the notches for the post. It’s best to take a little less to give some room for adjustment.
- Once that is good, make your final adjustment on the end joints if necessary and push it tight to the decking.
Nice job! You’re done. Now stand back and admire how awesome you are.
Decking installation and picture frame are now complete
Following these steps should help you install a picture framed deck like a professional. Be sure to start with the right decking materials, plan ahead to cut your border around your deck railing posts and avoid tricky issues that could mean costly do-overs, and know how to lay out your decking boards for the best possible outcome. We hope these tips help you enjoy building your deck and enjoying it for years to come as a job well done.

Related Posts