

If you are a contractor considering Pura NFC ® Siding by Trespa for your next siding project, check out this step-by-step video of the exclusive Climate-Shield CST1 Rainscreen System. The CST1 system creates a higher performing fastening method for Pura rainscreen siding over plywood or OSB exterior sheathing. Experience faster installations with fewer call backs, saving you time, money and aggravation.

Stunning with stucco!
Pura NFC rainscreen siding in gorgeous Romantic Walnut Wood Décor
To give you an idea of the many advantages, we've briefly broken down the steps and materials here.
When you're ready, the full 7 minute video is available below.
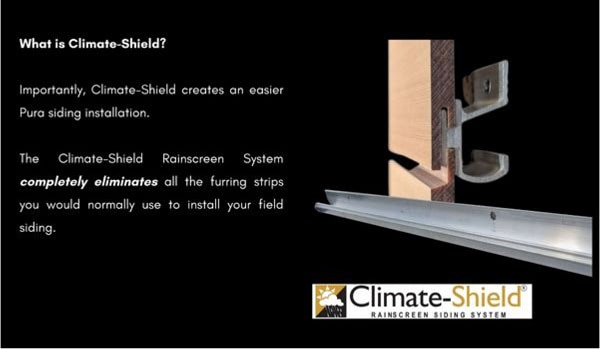
What is the Climate-Shield CST1 Rainscreen Siding System?
Climate-Shield Rainscreen System creates an open joint rainscreen system. Climate-Shield components replace the need for any furring strips behind your field siding. That's right, none.
A screenshot from the video about the Climate-Shield components
A Better Designed System
The Climate-Shield CST1 system is a patented design created to work with Pura NFC siding, exclusive to Mataverde. The CST1 Starter Rail and Rainscreen Clip were designed to make your Pura installation over plywood or OSB better, easier, and faster.
Prevents call backs from customers
The components in the Climate-Shield system are stainless steel. They will not decay, rot or warp. The CST! system starter rail and clips are made to automatically line up your courses of siding, automatically create the correct rainscreen gap, and eliminate furring strips. In short, it is made to create better rainscreen siding.
Pura NFC rainscreen siding is ideal for residential and light commercial projects. Download the free project portfolios downloads for more information and design ideas.


What is Pura NFC by Trespa HPL Siding?
 Pura NFC is a premium cladding that boasts good looks AND low maintenance needs. Shown in Aged Ash wood décor.
If you haven't yet installed Pura NFC, it is a High Pressure Laminate (HPL) premium cladding. Pura NFC is engineered to outperform other sidings. Pura siding is finished with proprietary Electron Beam Curing (EBC) for a closed cell surface that locks out dirt. Pura siding requires no pre-finishing, refinishing, or painting. Extremely durable, incredibly colorfast, with a 10 Year Limited Warranty against fading. It comes in a wide range of beautiful wood décors and matte lumen decors, suitable for any style home or building exterior design.
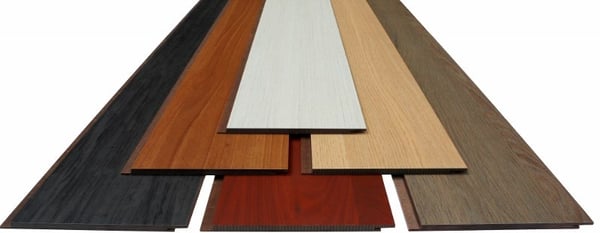 Just a few of the incredibly realistic and fade resistant wood decors.
RELATED: See all of the Pura siding colors available here
Step 1. Preparing To Install The CST1 Rainscreen Siding System
First things first: Proper Prior Planning Prevents Poor Performance.
Before you get started, make sure that you have either OSB exterior sheathing or Plywood exterior sheathing. The Climate-Shield system is designed to install over either of these sheathings.
The Climate-Shield system is designed to let water in and out. Make sure your exterior wall is waterproof and protected with a weather resistive barrier.
Step 2. Installing Pura NFC Trim
If your project calls for Pura NFC trim components, this is the only place you will need to use furring strips.
Installing Outside Corner Trim
Install the strips with screws and level. The furring strips must be covered with a black EPDM tape or other weather resistive barrier once it is installed.
Now that your furring strips are lined up at the corners, it’s time to install your outside corner trim.
Installing the window and door trim
A big advantage of Climate-Shield Rainscreen System over other rainscreen systems is that it does not flatten the look of your exterior. Instead it installs easily around doors and windows to define the openings.
Step 3. The Climate-Shield Starter Rail vs. the Furring Strip Method
The CSTR8 starter rail is designed for Pura installation. It 8’ long, 100% stainless steel, easy to handle and install. Once your starter rail is installed level it makes all your following courses of siding line up perfectly to the top of the wall.
.jpg?width=600&height=338&name=GW%20installing%20starter%20rail%20(Youtube%20Video%20Chapter).jpg) The CST8 stainless steel starter rail
The CST8 stainless steel starter rail
Installing traditional closed joint rainscreen siding means starting with a complicated matrix of wood furring strips as the base. These furring strips have to be cut and installed one-by-one into a grid before you can attach the field siding.
The upside of furring strips is they are less costly when budgeting your initial material investment. The downside is that those savings can be quickly eaten up by the time and labor needed to cut and install so many furring strips.
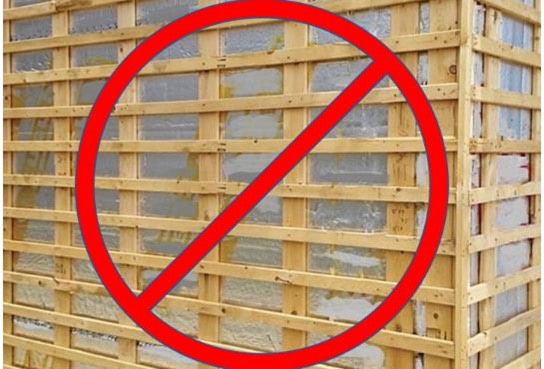
The old way to install vertical rainscreen siding. A complicated and time consuming matrix of furring strips that may trap moisture behind the siding.
The problem with a complicated grid of furring strips is the corners and pockets it creates behind your siding. Rain and humidity will try to evaporate up and out through the only place it can, the top course. If moisture and humid air has no simple way to flow out the top it stays trapped against the wood strips and your building exterior wall. This causes ideal conditions for rot, mold, warping, insect damage, and other decay that everyone wants to avoid.
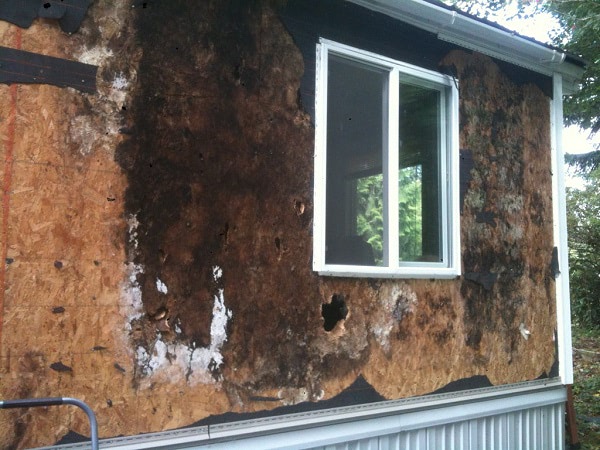
This project was to replace replacing traditionally installed siding with better rainscreen siding. Look what they found behind the closed joint system: Black mold, decay, and damage to the entire exterior wall!
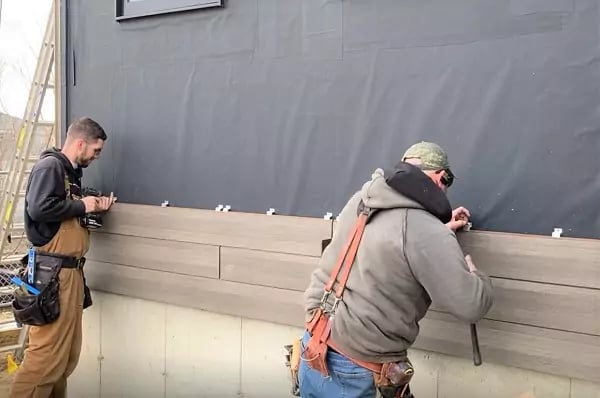
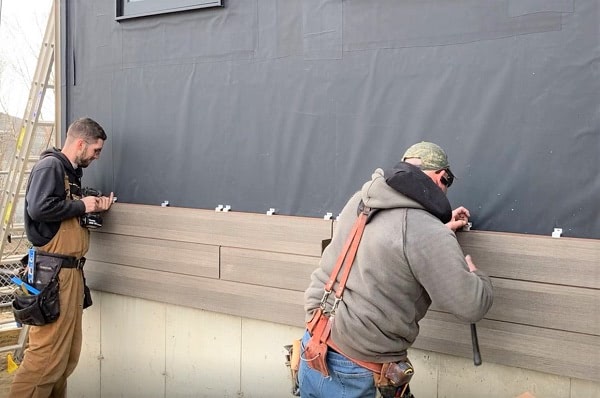
Step 4. Install The First Course of Rainscreen Siding
Slide the first siding board into the CSTSR8 starter rail. Tap into place to make sure the board is sitting tightly on the starter rail. Make sure there is adequate spacing for movement during temperature and humidity changes. And that's it!
Step 5. Fastening the Rainscreen Clips
Here's the secret sauce, the patented CST1 Rainscreen clips.
The clips installed with one screw each and automatically create the correct rainscreen gap. The clip needs a 1mm spacer to allow for the expansion and contraction, conveniently equal to the thickness of a paperclip. The clip is then fastened with one screw.
RELATED: 5 Reasons Pura NFC Rainscreen Siding Was Chosen For This Exterior
18 second video overview of the CST1 Rainscreen Clip
Step 6. Adding the next courses of siding
Tap it home. Make sure your gap at the end is set properly for expansion and contractions.
Step 7. Installing the top course of siding
The top edge of the end board should be ripped to the proper dimension to fit under the soffit. The bottom edge of the board should be left intact to fit securely in the clips. The top board is pre-drilled, then fastened.
Watch How Easy The CST1 Rainscreen Installation Process Is:
Ready for the all the details and full demonstration? Click play and check it out.
We hope this was helpful for your next project. For any questions, prices and samples please don't hesitate to contact us. We are ready to help.
Don't forget to download your free Trespa Pura Project Portfolios

Related Posts